[프로젝트] 실시간 얼굴 감정 서비스
대략 2개월 정도? 프로젝트에 참여하여 얼굴 감정 분석이라는 서비스 기능을 구현하는 동안 어떻게 구현을 했고, 어떤 오류가 발생했는지를 적어볼 것 입니다.
어째서 이런 서비스를 만들게 되었냐면, 기존에 하던 프로젝트가 채팅의 감정을 분석하는 플랫폼인데 여기에 추가적으로 크리에이터 표정도 분석해보면 좋을거 같다는 아이디어가 나와서 개발하게 되었다.
[본론]
구글 검색을 통해서 다양한 얼굴 감정 분석 모델을 찾아 보았다. 어떤 모델을 사용 할지 고민이 였다.
그렇게 찾다가 이 모델을 사용 하게 되었다.
https://github.com/petercunha/Emotion?tab=readme-ov-file
GitHub - petercunha/Emotion: :smile: Recognizes human faces and their corresponding emotions from a video or webcam feed. Powere
:smile: Recognizes human faces and their corresponding emotions from a video or webcam feed. Powered by OpenCV and Deep Learning. - petercunha/Emotion
github.com
이 깃허브에는 웹캠을 통해서 사용자의 얼굴 분석을 해주고 있었습니다.
- keras
- numpy
- scipy
등의 라이브러리를 설치하였고 잘 작동되었다.
이제는 이 코드를 웹캠이 아닌 크리에이어터의 동영상에 적용을 해야 합니다.
이 부분에서 어떻게 크리에이터의 동영상을 분석을 해야 하는지 고민이 였습니다.
서비스를 완성 시키기 위해서는 얼굴 분석이 되고 있는 장면을 플랫폼을 이용하는 사용자에게 전송을 해야 합니다.
이때 발생하는 문제점은 얼굴 분석을 하기 위해서는 동영상이 필요하고 실시간으로 이를 전송 하기 위해서는 서버를 구축해야 했습니다.
그래서 얼굴 감정 모델을 구현하기 위해 Flask를 사용하였고 , 실시간 동영상을 처리하기 위해 pyautogui를 사용하여 동영상을 캡쳐하는 형태로 진행 하였습니다.
class FaceEmotion(threading.Thread):
    def __init__(self):
        threading.Thread.__init__(self)
        self.face_cascade = cv2.CascadeClassifier('./models/haarcascade_frontalface_default.xml')
        self.emotion_model_path = './models/emotion_model.hdf5'
        self.emotion_classifier = None
        self.emotion_labels = get_labels('fer2013')
        self.emotion_offsets = (20, 40)
        self.current_emotion = "unknown"
        self.emotion_probabilities = {}
        self.running = False

		while self.running:
            screenshot = pyautogui.screenshot(region=(408, 247, 848, 472))
            screenshot = np.array(screenshot)
            screenshot_rgb = cv2.cvtColor(screenshot, cv2.COLOR_BGR2RGB)
            screenshot_gray = cv2.cvtColor(screenshot, cv2.COLOR_BGR2GRAY)
            faces = self.face_cascade.detectMultiScale(screenshot_gray, scaleFactor=1.1, minNeighbors=5,
                                                       minSize=(30, 30))

            for (x, y, w, h) in faces:
                face_coordinates = (x, y, x + w, y + h)
                x1, y1, x2, y2 = face_coordinates
                live_face_encoding = face_recognition.face_encodings(screenshot_rgb, [(y1, x2, y2, x1)])[0]
                distance = face_recognition.face_distance([face_encoding], live_face_encoding)
이렇게 모델을 불러 옵니다.
모델을 인식 할 수 있는 감정의 갯수는 깃허브에서 제공된 감정의 개수와는 달랐습니다.
angry,disgust,fear,happy,sad,surprise,neutral 총 7개의 얼굴 감정을 분석 할 수 있었습니다.
def open_website(uri):
    url = "https://www.youtube.com/watch?v="
    if url == "favicon.ico":
        return "", 204
    else:
        webbrowser.open_new_tab(url+uri)
플라스크 서버 형태로 구현 하여 내가 원하는 스트리밍의 주소를 입력하게 되면 화면에 해당 하는 영상이 재생이 되고 스크린샷을 통해서 얼굴 감정 분석이 실행되었습니다.
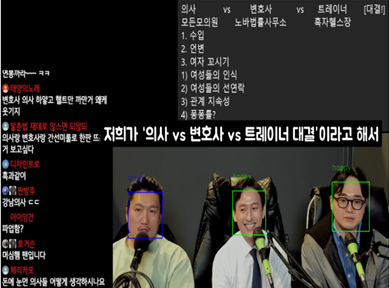
이렇게 결과를 확인 할 수 있었습니다.
하지만 저희 서비스는 단순히 모든 사람의 얼굴을 분석하는 것이 아니라, 크리에이터의 얼굴 감정을 분석해야 했습니다. 다른사람들의 얼굴 감정이 들어가는 것은 원치 않는 결과였습니다.
그래서 특정 사진의 얼굴만 분석하는 방법을 찾아 냈습니다.
바로 사진을 Aws S3에 올리고 그 uri를 플라스크에서 처리하는 방식입니다.
플라스크에서 처리를 할 때 face_recognition을 통해서 얼굴 차이점 거리를 계산하여 그 값이 어느 값보다 낮게 나올 경우에만 얼굴 감정 분석을 실행 하였습니다.
@app.route("/compare", methods=["POST"])
def compare_faces_endpoint():
    if request.method == "POST":
        if 'imgurl' not in request.form or 'screen' not in request.form:
            return jsonify({"error": "error"}), 400

        imgurl = request.form['imgurl']
        screen = request.form['screen']

        # 이미지에서 얼굴을 감지하고 벡터로 변환
        face_encoding1 = face_emotion.detect_img_face(imgurl)
        # 화면에서 얼굴을 감지하고 벡터로 변환
        face_encoding2 = face_emotion.detect_img(screen)

        # 두 얼굴의 유사도를 계산
        similarity = compare_faces(face_encoding1, face_encoding2)

        return jsonify({"similarity": similarity}), 200
이런식으로 사진과 스크린샷 속 사진과의 거리를 측정하여 얼굴 감정을 분석하였습니다.
그 결과
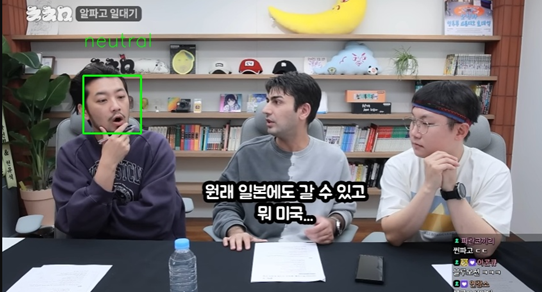
모든 사람의 얼굴을 분석하는 것이 아니라 넣은 이미지의 인물의 얼굴만 분석을 할 수 있었습니다.